RockBLOCK 9704 Python Walkthrough
Introduction
The RockBLOCK 9704 is the most convenient and cost-effective way to add satellite IoT communication (via IMT) to your project. It offers efficient power management, flexible serial I/O options, and access to our development SDKs and Cloudloop Data service for true ‘plug and play’ satellite connectivity.
This Getting Started guide provides a crash course in using the RockBLOCK 9704 with a commonly available, Python-capable microcontroller platform. The example setup uses a USB serial interface and our open-source Python library available on PyPi to send and receive messages via the Iridium satellite network — giving you a foundational understanding to build your own satellite-enabled solution.
For full documentation and more advanced code examples, please refer to:
• Python Library (rockblock9704): https://pypi.org/project/rockblock9704
• C/Arduino SDK and hardware reference: https://github.com/rock7/RockBLOCK-9704
What You’ll Need
To complete this guide, you’ll need:
- RockBLOCK 9704 (either SMA + Antenna or Patch variant)
- A valid Iridium airtime & data plan (you’ll have the option to purchase this during setup)
- A device capable of running Python scripts, with USB support (e.g. a Raspberry Pi Zero, USB-equipped microcontroller, or single-board computer)
- MicroSD card + power supply (for your chosen device, if required)
- USB-C cable to connect the RockBLOCK 9704 (e.g. USB-C to Micro-USB if using a Pi Zero)
Ensure your USB-C cable supports data as well as power — not all USB cables are data-capable.
Hardware Setup
Step 1: Activate your RockBLOCK 9704
Skip this step if you already have a Cloudloop account
Unbox your RockBLOCK 9704 and locate the serial number printed on the Iridium modem. You’ll now need to create a Cloudloop account and register your device:
Once your account is set up, follow the prompts to add your RockBLOCK 9704, select a data package, and activate airtime.
Step 2: Prepare your Device
In this example, we’re using a Raspberry Pi Zero — a low-cost, compact Linux computer ideal for prototyping satellite IoT applications. You can follow similar steps with any device that supports Python and has USB host capabilities.
If using a Raspberry Pi Zero:
- Download the Raspberry Pi Imager: 👉 https://www.raspberrypi.com/software
- Use the Imager to install a suitable OS — we recommend Raspberry Pi OS Lite (64-bit) for this guide.
- Optionally, enable SSH and configure Wi-Fi during the image creation process so you can access your device headlessly (without monitor or keyboard).
Development Environment Setup
We will be using Python to control the sending and receiving of messages, and the core package is included in the Raspberry Pi OS so we will just need to install the RockBLOCK 9704 library.
Step 1: Create a Virtual Environment
Firstly we will create a virtual environment to both install the required libraries and from which we will run our Python scripts:
python3 -m venv --system-site-packages rb-env
Step 2: Activate the Virtual Environment
source rb-env/bin/activate
Your cursor should now be prefixed with your virtual environment name (rb-env)
Step 3: Install the RockBLOCK 9704 Python Library
pip install rockblock9704
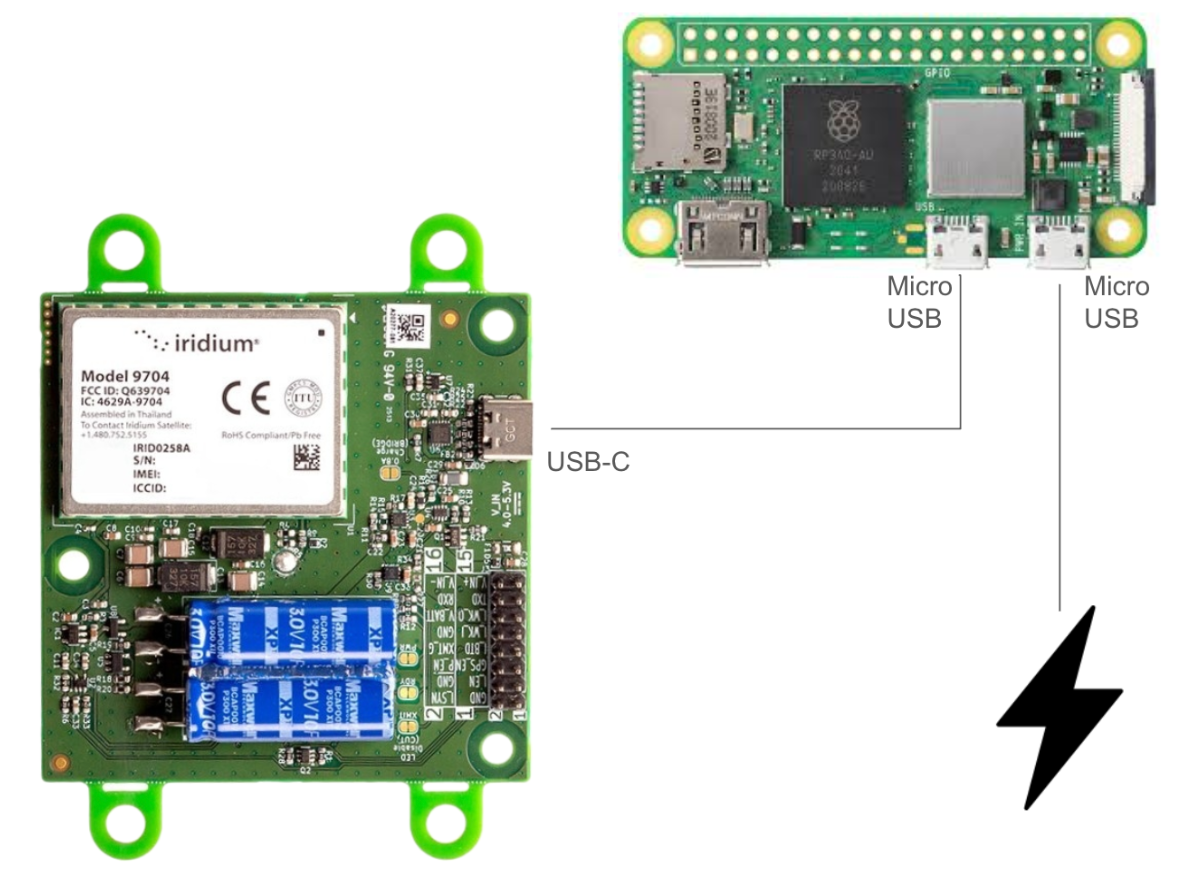
Connect your Pi Zero and RockBLOCK 9704
Use a USB-C to Micro USB cable to connect your devices together.
With both devices powered on and connected, we can use our python library to validate the connection and report some device statistics.
Step 1: Identify the RB9704 connection
With the RB9704 connected via the USB cable, we need to identify what name has been allocated to the connection and note this down for use in our script:
ls /dev/tty*
or
dmesg | grep tty
The name can vary from machine to machine, but will typically be something like ttyUSB0 or tty.usbserial-XXXXXXXX
The RockBLOCK 9704 will appear as a USB serial device — no additional drivers required on Linux-based systems.
Step 2: Create a Python test script
Now we’ll create a short test script to validate the connection and ensure we can read some details from the device. Firstly, create the test script:
nano testRB9704.py
Then add the following code which will create a connection to the RockBLOCK 9704 (using the tty* name you identified) and display connection status:
from rockblock9704 import RockBlock9704

rb = RockBlock9704()
rb.begin('/dev/ttyUSB0') # Change to your device ( `ls /dev/tty*` or `dmesg | grep tty` )

print("Signal Strength is:", rb.get_signal())
print("---")
print("HW Version is:", rb.get_hardware_version())
print("---")
print("FW Version is:", rb.get_firmware_version())
print("---")
print("Serial Number is:", rb.get_serial_number())
print("---")
print("IMEI is:", rb.get_imei())
print("---")
print("ICCID is:", rb.get_iccid())
print("---")
print("Board Temp is:", rb.get_board_temp())
print("---")
print("SIM Card is installed:", rb.get_card_present())
print("---")
print("SIM Card is connected:", rb.get_sim_connected())
print("---")
rb.end()
If everything is connected properly you should see a successful connection, the serial number you noted previously, and that the Sim card is valid.
Sending Messages from your RockBLOCK 9704
With everything successfully connected, we can now get to the exciting part of sending and receiving messages via satellite.
Step 1: Check you have a good satellite signal
Fun fact, the Iridium satellites are orbiting the earth at 30,000 km per hour! To ensure our message is able to reach one of these, then your antenna must have a clear view of the sky, free from any obstructions such as tall buildings, trees, and hilly or mountainous terrain. We’ve provided a handy guide on how to check this in more detail.
Step 1a (optional): Check you have a good satellite signal
The following simple Python code will poll your RockBLOCK device to check for signal strength, which can be handy when trialling a new location. Signal strength ranges from 0 (no signal) to 5:
Please note that it is not necessary to check signal connection prior to sending or receiving messages - this is to enable you to find and verify a good location.
import time
from datetime import datetime
from rockblock9704 import RockBlock9704

rb = RockBlock9704()

if not rb.begin('/dev/ttyUSB0'): # Change to your device ( `ls /dev/tty*` or `dmesg | grep tty` )
    print("Failed to connect to RockBLOCK.")
    exit(1)

try:
    while True:
        timestamp = datetime.now().strftime("%Y-%m-%d %H:%M:%S")
        signal = rb.get_signal()
        print(f"{timestamp} | Signal Strength: {signal}")
        time.sleep(5) # Adjust for interval between Signal polls
except KeyboardInterrupt:
    pass
finally:
    rb.end()
Step 2: Send a message
Great, now you’ve located your RB9704 with a good signal to the satellite then it’s time to send a ‘Hello World’ message:
from rockblock9704 import RockBlock9704

# Always check if begin has returned successfully
rb = RockBlock9704()
connected = rb.begin('/dev/ttyUSB0') # Change to your device ( `ls /dev/tty*` or `dmesg | grep tty` )

if connected:
    print("Successful connection!")

    # Sending message
    sent = rb.send_message(b"Hello, world!", timeout=60) # Change timeout depening on message size if required

    if sent:
        print("Message sent!")
    else:
        # If the timeout expires
        print("Sending failed")

    rb.end()
else:
    print("Failed to connect to RockBLOCK 9704")
Receiving Messages to your RockBLOCK 9704
Step 1: Checking for received messages
The Iridium 9704 modem does not support onboard message caching and therefore it is imperative that you are checking for messages on your device regularly to ensure they are not missed. The following simple code will poll for, and display, messages every 1 second and you can set this running before sending a message to the device and monitor the signal and message receipt.
if your project requires sophisticated onboard management of message queuing and retries then take a look at our RockBLOCK Pro and RockREMOTE range.
import time
from rockblock9704 import RockBlock9704

rb = RockBlock9704()
rb.begin('/dev/ttyUSB0') # Change to your device ( `ls /dev/tty*` or `dmesg | grep tty` )

try:
    print("Listening for MT messages... Press Ctrl+C to stop.")
    while True:
        msg = rb.receive_message()
        if msg:
            print("Received:", msg)
        time.sleep(1)
except KeyboardInterrupt:
    pass
finally:
    rb.end()
Step 2: Sending a test message to your RockBLOCK 9704
The simplest way to send a message to your RockBLOCK 9704 is to utilise our Cloudloop platform: https://data.cloudloop.com/
Login with the account you created earlier and locate your device in the ‘Things’ collection. Once you have clicked on your device you should see the option to ‘Send Message’.
Choose IMT as the message type and add your text to the ‘Payload’ section and hit ‘Send’.
Your message will now be sent to your RockBLOCK 9704 over the Iridium network, and should appear within a few seconds depending on signal availability.
You can also send messages programmatically via the Cloudloop API — ideal for integrating with your own platform or server-based tools.
What Next?
🎉 Congratulations, you’ve completed setting up your device and can successfully send and receive messages!
For a more expansive overview of our RockBLOCK 9704 SDK, then review our online documentation: https://docs.groundcontrol.com/iot/rockblock-9704/intro
If you would like to connect to the RockBLOCK 9704 via the serial (UART) interface, power via a battery, or enable GNSS passthrough; then review our hardware specification for pinouts and power requirements: https://docs.groundcontrol.com/iot/rockblock-9704/hardware
To get started with writing your own RockBLOCK 9704 application, please review our Readme